Showing posts with label pumpkin. Show all posts

Tuesday, November 12, 2024

How to Draw a Turkey - Free Elementary Art Sub Lesson

Step-by-Step Turkey Tutorial


Why draw turkeys???

Drawing fall turkeys isn’t just about cute pictures—it’s a fantastic way to help kids learn, grow, and have a ton of fun. Here are some reasons to consider teaching this lesson:

1. Drawing helps kids build their tiny hand muscles.

2. Turning simple shapes into a turkey sparks creativity. Kids start seeing the world in exciting new ways.

3. When kids finish their turkey drawings, they feel super proud. It's a great confidence boost.

4. Figuring out where to put each shape helps kids develop critical thinking skills.

5. Drawing with shapes is a sneaky way to teach math. Who knew turkeys were so educational?

6. Drawing a turkey can lead to chats about Thanksgiving and traditions.

7.  Adding little details to their drawings helps kids improve their concentration.

8.  Each turkey is a little masterpiece that reflects the child's personality.

So, with that, let's get started.

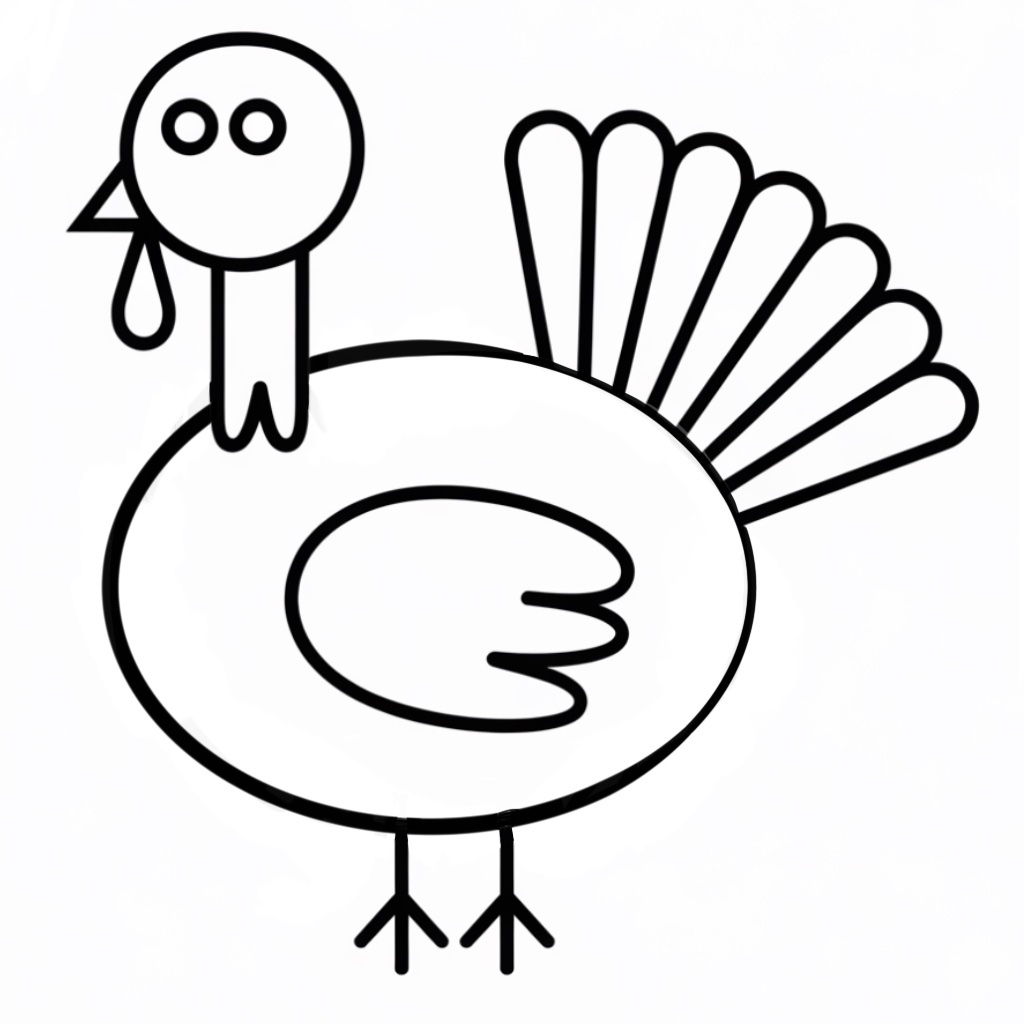
1. Start by drawing a big oval in the middle of the paper. This will be the turkey's body.


2. Draw a small circle above the turkey, to the side a little.


3. Draw two lines down from the head to the body. This makes the neck. You can draw a bumpy line between the lines or draw a straight line. 


4.  Draw a small triangle on the side of the head for a beak and two small circles inside the head for the eyes.


5.  Draw a curved shape under the head for the waddle.


6.  On the back of the oval body, draw ling curved shapes for the tail feathers. Draw was many as you like.


7. Inside the body, draw a "C" shaped curve for the shape of a wing. On one end of it you can draw a bumpy line to make it look like feathers are sticking out.


8.  On the bottom of the turkey, draw two straight lines for the legs. Then, draw three lines out from each to look like the turkey feet.


What can you ado after you draw it?

You can fill it with pattern.


You can add a background.


You can color it in. 


Where can you find turkey lessons that are ready to hand to a sub?

If you would like some ready made art sub lessons and early finishers worksheets, check these out in my TPT shop: Art Sub Lessons.

Click to see Create a Turkey in Disguise print and go lesson. You can buy this, print it out, and you are ready to teach it. Or add it to your wish list for later!


Click to see the worksheet Create a Turkey in Disguise early finishers worksheet. It is ready for you to purchase and print out or you can add it to your wish list!


Monday, October 14, 2024

Art Sub Lesson - Zentangle Pumpkins - Middle School


Lesson Plan: Zentangle Pumpkin Art

Grade Level: Middle School (Grades 6-8)

Objective:

  • Students will learn about the Zentangle method and its benefits.
  • Students will create a pumpkin drawing filled with intricate Zentangle patterns.

Materials:

  • White drawing paper
  • Pencils and erasers
  • Black fine-tip markers or pens
  • Colored pencils or markers (optional)
  • Reference images of pumpkins and Zentangle patterns

Introduction (10 minutes):

  1. Discussion: Introduce the concept of Zentangle. Explain that it is a method of creating beautiful images by drawing structured patterns. Discuss the benefits of Zentangle, such as relaxation and increased focus.
  2. Pumpkin Talk: Show images of pumpkins and discuss their shapes and textures. Explain that students will combine the shape of a pumpkin with Zentangle patterns.

Activity (40 minutes):

  1. Sketching the Pumpkin:

    • Have students lightly sketch a large pumpkin in the center of their paper using a pencil. Encourage them to add details like the stem and any unique features.
  2. Dividing the Pumpkin:

    • Instruct students to divide their pumpkin into several sections using light pencil lines. These sections will be filled with different Zentangle patterns.
  3. Drawing Zentangle Patterns:

    • Demonstrate a few basic Zentangle patterns on the board, such as spirals, dots, and lines. Provide reference sheets with various patterns for inspiration.
    • Students will fill each section of their pumpkin with a different Zentangle pattern. Encourage them to use a variety of patterns and to take their time with each one.
  4. Outlining:

    • Once the patterns are complete, students will outline their pumpkin and patterns with a black fine-tip marker or pen. This will help the patterns stand out.
  5. Adding Color (Optional):

    • If desired, students can add color to their Zentangle pumpkins using colored pencils or markers. Encourage them to use color thoughtfully to enhance their patterns.

Conclusion (10 minutes):

  1. Gallery Walk: Have students display their artwork around the classroom. Allow time for a gallery walk where students can admire each other’s work.
  2. Discussion: Conclude with a discussion about what they enjoyed and learned from the activity. Ask questions like:
    • What did you find most relaxing or challenging about creating Zentangle patterns?
    • How did you decide which patterns to use in each section of your pumpkin?

Assessment:

  • Participation in discussion and activity
  • Creativity and effort in the artwork
  • Ability to incorporate Zentangle patterns into their pumpkin drawing

This lesson plan not only teaches students about the Zentangle method but also allows them to express their creativity in a fun and seasonal way! 🎃🖊️

Captivating Pumpkin Art: Unleash Your Students' Creativity with Beatriz Milhazes-inspired Elementary Art Lessons

 Students will learn about the Brazilian artist Beatriz Milhazes, her use of bright colors, geometric patterns, and floral motifs, and apply these elements to create their own pumpkin drawings.


Materials:

  • White drawing paper (8.5" x 11" or larger)

  • Pencils and erasers

  • Black markers or crayons

  • Brightly colored markers, crayons, or watercolor paints

  • Circular stencils or various-sized lids for tracing circles (optional)

  • Reference images of Beatriz Milhazes' work (optional)


    1. Introduce Beatriz Milhazes:

      • Show examples of her vibrant, geometric, and floral works.

      • Discuss her style, focusing on her bold use of colors and patterns.

    2. Show Examples:

      • Display a few pieces by Milhazes and highlight the key elements: bright colors, overlapping shapes, floral patterns, and a sense of rhythm and movement.

    Activity Steps (30-35 mins):

    1. Draw the Pumpkin Shape:

      • Start by drawing a large, simple pumpkin shape in the center of the paper using a pencil.

      • Encourage the students to make their pumpkin big to fill most of the paper.


        1. Divide with Geometric Patterns:

          • Using circular stencils or lids, draw different-sized circles within the pumpkin shape to create sections.

          • Add other geometric shapes like triangles, squares, and wavy lines in some sections.

        2. Outline with Black:

          • Trace over all the pencil lines with black markers or crayons to create bold outlines.

        3. Decorate with Patterns:

          • Inside each geometric section, draw floral motifs, stripes, or any decorative patterns inspired by Milhazes’ work.Encourage students to use their creativity to fill each section with different designs.

            1. Color the Sections:

              • Use bright, contrasting colors to fill in the geometric sections and patterns.

              • Make sure to use a variety of colors to make the pumpkin vibrant and dynamic.

            2. Add a Background:

              • Draw and color simple geometric or floral patterns in the background to complement the pumpkin.

              • This will enhance the overall look and feel of the artwork, making it cohesive and lively.

            Conclusion (5 mins):

            • Display the completed Milhazes-inspired pumpkins around the room.

            • Have a quick discussion about how students felt using bright colors and patterns.

            • Encourage students to share what they enjoyed the most about combining Milhazes’ style with their pumpkin drawings.

            Reflection:

            • Ask students what they found easy or challenging about this activity.

            • Talk about how art from different cultures can inspire new and exciting creations.