Showing posts sorted by date for query lines. Sort by relevance Show all posts

Tuesday, January 28, 2025

Valentine Art Sub Plan - Free Elementary Lesson

Easy Free Valentine’s Day Art Lesson


Do your “big kids” sometimes beg you to let them do a lesson that the “little kids” do? A sub day is a good opportunity to let students do an easy, no-fail lesson.


They also beg to let them do valentine cards around the holiday, so why not let them? This can be done on printer paper and using just crayons. The paper can be folded in half if they want to make a greeting card or just done on a full sheet of paper.


  • Prepare the Paper

    • Students can either fold their paper to create a greeting card or use the entire paper as a flat surface.

  • Draw the Heart

    • In the center of the paper, students should draw a heart shape. It doesn't have to be perfect.


  • Add Random Lines

    • Next, students should draw random lines that cut through the heart and travel around the paper.


  • Trace the Heart

    • Students then trace the heart shape heavily with a crayon.

  • Color Inside the Heart

    • Color the spaces inside the heart shape heavily. Students can use a particular color scheme or random colors. Each shape should be filled with a different color than the one next to it.


  • Color or Pattern Outside the Heart


    Wednesday, December 11, 2024

    How to Draw a Gingerbread Man - Free Directed Drawing Art Lesson

    Let's create a festive gingerbread man! Grab your paper and drawing materials, and follow these steps:


    1.  Head - Draw a large oval or circle for the head. Make sure it's centered at the top of your paper.


    2.  Body - Just below the head, draw a slightly elongated oval or rectangle for the body. It should be about twice the height of the head. 


    3. Arms - From the top sides of the body, draw two curved lines extending outward and s lightly upward to form the arms. They should be about the same length as the body. You can erase the top of the oval inside the body.


    4. Legs  - From the bottom of the body, draw two slightly curved lines extending downward for the legs. They should be a little longer than the arms.


    5. Face  - Add two small circles for the eyes and a larger circle or oval for the mouth. You can add a small dot in each eye for the pupils. Draw a curved line or small oval for the nose


    6. Buttons - Draw three small circles down the center of the body for buttons. You can make them different colors to add some fun detail. Also, erase the bottom curve of the circle head.


    7. Details - Add wavy lines around the edges of the arms, legs, and head to represent the icing.

       - You can add more decorations like a bow tie, stripes, or patterns on the gingerbread man's body.


    8. Coloring - Color the gingerbread man brown to represent the cookie.

       - Use bright colors for the icing, buttons, and other decorations.


    And there you have it—a delightful gingerbread man ready for the holidays! 🎄🍪


    Enjoy your drawing, and feel free to add any additional details to make it even more festive! 


    For fun holiday early finishers worksheets, visit my TPT SHOP: Art Sub Lessons.

    Tuesday, December 3, 2024

    How to Draw a Christmas Tree - Free Directed Drawing

     How to Draw a Christmas Tree - Directed Drawing

    drawing of a Christmas Tree


    Let's create a festive Christmas tree. Grab your paper, pencils, and perhaps some colorful markers or crayons:

    1. **Triangle Outline**:

       - Start by drawing a large triangle in the center of your paper. This will be the outline of your tree. Draw it lightly so that you can erase it easily later.

    2. **Branches**:

       - Along the sides of the triangle, draw several curved lines to create the look of pine branches. These lines should fan out slightly and get smaller as you move up the tree. 

    3. **Tree Trunk**:

       - At the bottom center of the triangle, draw a small rectangle for the tree trunk.

    4. **Decorations**:

       - Erase the lightly drawn guidelines you drew in the beginning. Draw strings of lights or garlands by adding curved lines that wrap around the tree.

    - Add circles and ovals for ornaments, scatter them throughout the tree. You can also add a star at the top of the tree by drawing a small, five-pointed star.

    5. **Presents**:

       - Draw small rectangles and squares at the base of the tree to represent presents. Add bows and ribbon details to make them festive.

    6. **Coloring**:

       - Color the tree green, the trunk brown, and the ornaments in a variety of bright colors. Use yellow for the star and different shades for the lights and garlands.


    7. **Background**:

       - Add some background details like snowflakes, a snowy ground, or even a fireplace with stockings.

    And there you have it—a beautiful, festive Christmas tree! 🎄✨


    Would you like some easy and fun worksheets for the Christmas season? Check these out at my TPT shop: Art Sub Lessons

    Here are some examples: 

    Create an Elf in Disguise.    Only $.99

    Create a Reindeer in Disguise.   Only $.99

    Doodle a Nutcracker. Only $.99

    Draw a Gingerbread House. Only $.99

    There also some full length art sub lessons there for you to buy.

    Doodle Monsters in Winter. Only $4.00

    Doodle Monsters at Christmas.  Only $4.00


    Tuesday, November 12, 2024

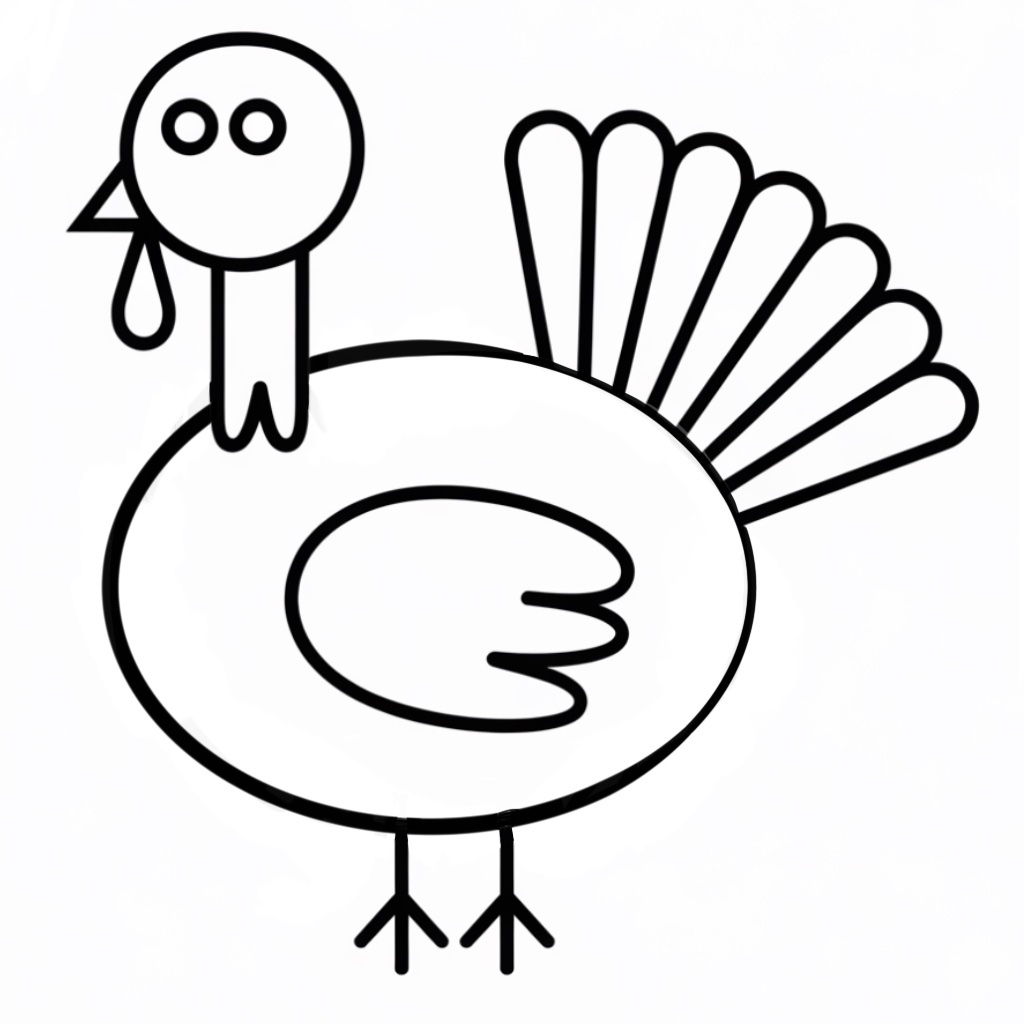
    How to Draw a Turkey - Free Elementary Art Sub Lesson

    Step-by-Step Turkey Tutorial


    Why draw turkeys???

    Drawing fall turkeys isn’t just about cute pictures—it’s a fantastic way to help kids learn, grow, and have a ton of fun. Here are some reasons to consider teaching this lesson:

    1. Drawing helps kids build their tiny hand muscles.

    2. Turning simple shapes into a turkey sparks creativity. Kids start seeing the world in exciting new ways.

    3. When kids finish their turkey drawings, they feel super proud. It's a great confidence boost.

    4. Figuring out where to put each shape helps kids develop critical thinking skills.

    5. Drawing with shapes is a sneaky way to teach math. Who knew turkeys were so educational?

    6. Drawing a turkey can lead to chats about Thanksgiving and traditions.

    7.  Adding little details to their drawings helps kids improve their concentration.

    8.  Each turkey is a little masterpiece that reflects the child's personality.

    So, with that, let's get started.

    1. Start by drawing a big oval in the middle of the paper. This will be the turkey's body.


    2. Draw a small circle above the turkey, to the side a little.


    3. Draw two lines down from the head to the body. This makes the neck. You can draw a bumpy line between the lines or draw a straight line. 


    4.  Draw a small triangle on the side of the head for a beak and two small circles inside the head for the eyes.


    5.  Draw a curved shape under the head for the waddle.


    6.  On the back of the oval body, draw ling curved shapes for the tail feathers. Draw was many as you like.


    7. Inside the body, draw a "C" shaped curve for the shape of a wing. On one end of it you can draw a bumpy line to make it look like feathers are sticking out.


    8.  On the bottom of the turkey, draw two straight lines for the legs. Then, draw three lines out from each to look like the turkey feet.


    What can you ado after you draw it?

    You can fill it with pattern.


    You can add a background.


    You can color it in. 


    Where can you find turkey lessons that are ready to hand to a sub?

    If you would like some ready made art sub lessons and early finishers worksheets, check these out in my TPT shop: Art Sub Lessons.

    Click to see Create a Turkey in Disguise print and go lesson. You can buy this, print it out, and you are ready to teach it. Or add it to your wish list for later!


    Click to see the worksheet Create a Turkey in Disguise early finishers worksheet. It is ready for you to purchase and print out or you can add it to your wish list!